To change the cabin air filter, locate the filter housing and remove the old filter. Insert the new filter and secure the housing.
Changing the cabin air filter is a simple task that can improve your car’s air quality. This filter helps remove dust, pollen, and other contaminants from the air entering the vehicle. Regular replacement ensures a cleaner environment inside your car, promoting better respiratory health.
Most filters are located behind the glove compartment or under the dashboard, making them easily accessible. Checking your vehicle’s manual provides specific instructions for your model. Keeping the filter clean also enhances the efficiency of your car’s HVAC system. Regular maintenance is key to a comfortable and healthy driving experience.
Why Change Cabin Air Filter
Your car’s cabin air filter plays a crucial role in keeping the air inside your vehicle clean and fresh. It filters out dust, pollen, and other pollutants before they enter your car. Over time, this filter becomes clogged and less effective, which is why changing your cabin air filter is essential. Understanding the reasons for changing your cabin air filter can help you maintain a healthier environment inside your car.
Benefits Of Changing Cabin Air Filter
Changing your cabin air filter offers numerous benefits. Here are some of the key advantages:
- Improved Air Quality: A new filter ensures that dust, pollen, and other pollutants are effectively removed from the air inside your car.
- Enhanced HVAC Performance: A clean filter allows your heating, ventilation, and air conditioning (HVAC) system to work more efficiently.
- Better Health: Reducing allergens and pollutants can help alleviate respiratory issues and allergies.
- Reduced Odors: A fresh filter helps eliminate unpleasant smells from mold, mildew, and other contaminants.
Let’s look at the benefits in a tabular format:
| Benefit | Description |
|---|---|
| Improved Air Quality | Filters out dust, pollen, and pollutants. |
| Enhanced HVAC Performance | Allows the system to work more efficiently. |
| Better Health | Helps alleviate respiratory issues and allergies. |
| Reduced Odors | Eliminates unpleasant smells from contaminants. |
Signs That Your Cabin Air Filter Needs To Be Changed
Knowing when to change your cabin air filter can help you maintain the air quality inside your car. Here are some signs that indicate it’s time to replace your filter:
- Reduced Airflow: If you notice a weaker airflow from your car’s vents, it could be due to a clogged filter.
- Unpleasant Odors: A dirty filter can cause bad smells to circulate in your car.
- Increased Allergies: If you or your passengers start experiencing more allergy symptoms, it might be time to change the filter.
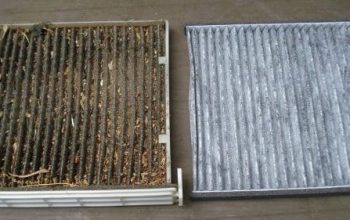
- Visible Dirt: Checking the filter for visible dirt and debris can help you determine if it needs replacing.
Sometimes, the signs are subtle. Here’s a table summarizing the signs:
| Sign | Description |
|---|---|
| Reduced Airflow | Weaker airflow from car vents. |
| Unpleasant Odors | Bad smells circulating in the car. |
| Increased Allergies | More allergy symptoms among passengers. |
| Visible Dirt | Filter appears dirty and clogged. |
Regularly checking and replacing your cabin air filter ensures a cleaner, healthier environment inside your vehicle.

Credit: www.carparts.com
Tools And Materials Needed
Changing the cabin air filter is a simple task that can improve air quality inside your vehicle. Before starting, gather the necessary tools and materials. This guide will help you understand what you need to efficiently change your cabin air filter.
Screwdriver
A screwdriver is essential for this task. Different cars require different types of screwdrivers. Check your car’s manual to see which type you need. You may need either a Phillips head or a flathead screwdriver. Make sure to have both on hand to avoid any delays.
Here’s a quick checklist for choosing the right screwdriver:
- Check the car manual for the specific type
- Ensure the screwdriver is the correct size
- Use a magnetic screwdriver to avoid losing screws
Using the right screwdriver ensures you don’t strip the screws. Stripped screws can be hard to remove later. If you find it hard to turn the screws, use a bit of penetrating oil. This will make the job easier. Keep a small container to store the screws. This prevents them from getting lost.
New Cabin Air Filter
The new cabin air filter is the star of this task. Choose a filter that matches your car’s make and model. You can find this information in your car’s manual or on the old filter itself. A high-quality filter improves air quality and lasts longer.
Here are some points to consider when buying a new cabin air filter:
- Check for compatibility with your car
- Opt for a filter with a high MERV rating
- Consider a carbon filter for better odor control
Installing a new cabin air filter is straightforward. First, open the glove box and remove the old filter. Then, insert the new filter in the same orientation. Make sure it fits snugly. Close the glove box and you’re done.
Keep a record of the installation date. This helps you remember when to change it next time. A well-maintained cabin air filter ensures you breathe clean air while driving.
Locating The Cabin Air Filter
Changing the cabin air filter in your car is crucial for maintaining clean air inside the vehicle. One of the first steps in this process is locating the cabin air filter. Knowing where to find it will save you time and effort. Here’s a guide to help you locate your cabin air filter with ease.
Consulting The Vehicle Manual
Your vehicle manual is the best place to start. The manual provides detailed instructions specific to your car model. Here are some key reasons to consult it:
- Accurate Information: The manual gives precise details on where the cabin air filter is located.
- Step-by-Step Instructions: It often includes step-by-step guides on how to access and replace the filter.
- Illustrations: Many manuals have illustrations or diagrams, making it easier to understand the process.
To find the information in your manual:
- Look for the index at the back of the manual.
- Find sections labeled ‘Air Filter’ or ‘Cabin Air Filter.’
- Read through the relevant pages for detailed instructions.
If you don’t have a physical copy, most manufacturers offer digital versions on their websites. Simply search for your vehicle’s make and model to find the manual online.
Finding The Cabin Air Filter Housing
Once you have consulted the manual, the next step is to find the cabin air filter housing. This component is usually located in one of three places:
| Location | Common Car Models |
|---|---|
| Behind the Glove Box | Most Sedans and SUVs |
| Under the Hood | Some Trucks and Larger Vehicles |
| Under the Dashboard | Luxury Cars and Older Models |
Here’s how to access the housing in these locations:
- Behind the Glove Box: Open the glove box and remove any items. Unclip or unscrew the glove box to access the filter housing.
- Under the Hood: Open the hood and locate the air intake area. Look for a rectangular or square housing near the windshield.
- Under the Dashboard: Check under the passenger side dashboard. You may need to remove a panel or cover to access the filter housing.
Once you locate the housing, you can easily proceed to remove and replace the cabin air filter. Remember to follow the specific instructions provided in your vehicle manual for the best results.

Credit: www.youtube.com
Removing The Old Cabin Air Filter
Changing your cabin air filter ensures you breathe clean air inside your car. A dirty filter can lead to bad odors, poor airflow, and increased allergens. Removing the old cabin air filter is an essential part of this process. Follow these steps to get started.
Opening The Cabin Air Filter Housing
First, locate the cabin air filter housing. It’s usually behind the glove box or under the dashboard. Refer to your car’s manual for the exact location. Once you find it, follow these steps:
- Empty the glove box: Remove all items to avoid any falling out.
- Detach the glove box: Gently press the sides of the glove box inward to release the stops.
- Locate the housing cover: Look for a rectangular plastic cover behind the glove box.
- Remove the cover: Use a screwdriver if needed to unscrew or unclip the cover.
With the housing cover off, you will see the old cabin air filter inside. Make sure to remember how the filter is placed. This will help you install the new one correctly.
Taking Out The Old Cabin Air Filter
Now that the housing is open, it’s time to remove the old cabin air filter. Follow these steps:
- Grip the filter: Hold the edges of the filter firmly.
- Pull out the filter: Gently slide the filter out of the housing. Be careful to avoid spilling dust and debris.
- Inspect the filter: Check for excessive dirt, leaves, and other debris. This will give you an idea of how dirty it was.
- Dispose of the filter: Place the old filter in a plastic bag to contain the dirt, then dispose of it properly.
With the old filter removed, you can now clean the housing area. Use a vacuum or damp cloth to remove any remaining dust or debris inside the housing. This ensures the new filter will work efficiently.
Installing The New Cabin Air Filter
Changing your cabin air filter is vital for clean air inside your car. The process is simple. Installing the new cabin air filter is a key step. Ensuring it fits correctly is essential for optimal performance.
Placing The New Cabin Air Filter
First, locate the cabin air filter housing. This is usually behind the glove box or under the hood. Remove the old filter carefully and note its orientation. This will help when placing the new filter.
Here are the steps to place the new cabin air filter:
- Check the direction of airflow. This is usually marked by arrows on the filter.
- Insert the new filter in the same direction as the old one.
- Ensure the filter sits snugly in the housing.
If you are unsure about the orientation, consult your vehicle’s manual. This will provide specific guidance.
It’s crucial that the filter is not forced into place. Forcing can cause damage to the filter or the housing. A properly placed filter ensures that all air passing through the system is cleaned effectively.
A table can help you remember the steps:
| Step | Action |
|---|---|
| 1 | Check airflow direction |
| 2 | Insert new filter in same direction |
| 3 | Ensure filter sits snugly |
Closing The Cabin Air Filter Housing
After placing the new filter, closing the cabin air filter housing is the next step. This ensures the filter stays in place and works efficiently.
Follow these steps to close the housing:
- Align the cover with the housing.
- Make sure all clips and screws are in place.
- Secure the cover by pressing or screwing it back.
Double-check for any gaps or misalignment. These can reduce the effectiveness of the filter. Ensuring a tight seal is crucial.
Here are some tips for closing the housing:
- Do not overtighten screws. This can damage the housing.
- Listen for clicks if there are clips. This ensures they are secure.
- Recheck the placement of the filter before closing.
Once the housing is closed, test the system by running the air conditioning or heater. This ensures everything is working correctly.
Regularly changing your cabin air filter keeps the air inside your car fresh and clean. Following these steps ensures a smooth replacement process.
Testing And Maintaining
Changing the cabin air filter in your car is essential for clean air inside the vehicle. After installation, testing and maintaining the filter ensures it works efficiently. Proper testing confirms the filter is correctly installed, while regular maintenance extends its lifespan.
Checking For Proper Installation
After installing a new cabin air filter, verify its correct placement. A properly installed filter improves air quality and prevents debris from entering the vehicle’s interior.
Steps to check for proper installation:
- Switch on the air conditioning or heating system.
- Set the fan to the highest setting.
- Observe the airflow from the vents.
- Listen for unusual noises.
Signs of correct installation:
- Strong, steady airflow from vents.
- No unusual sounds like rattling or whistling.
- No foul odors inside the vehicle.
Common issues and solutions:
| Issue | Solution |
|---|---|
| Weak airflow | Recheck filter placement, ensure it’s not clogged. |
| Unusual noises | Ensure the filter is securely in place. |
| Odors | Confirm the filter is new and suitable for your vehicle. |
Regularly Changing The Cabin Air Filter
Regularly changing the cabin air filter keeps the air inside your car clean and fresh. Manufacturers recommend changing the filter every 12,000 to 15,000 miles.
Benefits of regular filter changes:
- Improved air quality inside the vehicle.
- Reduced allergens and pollutants.
- Extended life of the HVAC system.
How to know when to change the filter:
- Check the vehicle’s maintenance schedule.
- Observe reduced airflow from vents.
- Notice any unusual smells.
- Inspect the filter for visible dirt and debris.
Steps to change the filter:
- Locate the cabin air filter compartment.
- Remove the old filter carefully.
- Install the new filter according to the instructions.
- Secure the compartment cover.
Maintaining a clean cabin air filter ensures a comfortable and healthy driving environment.
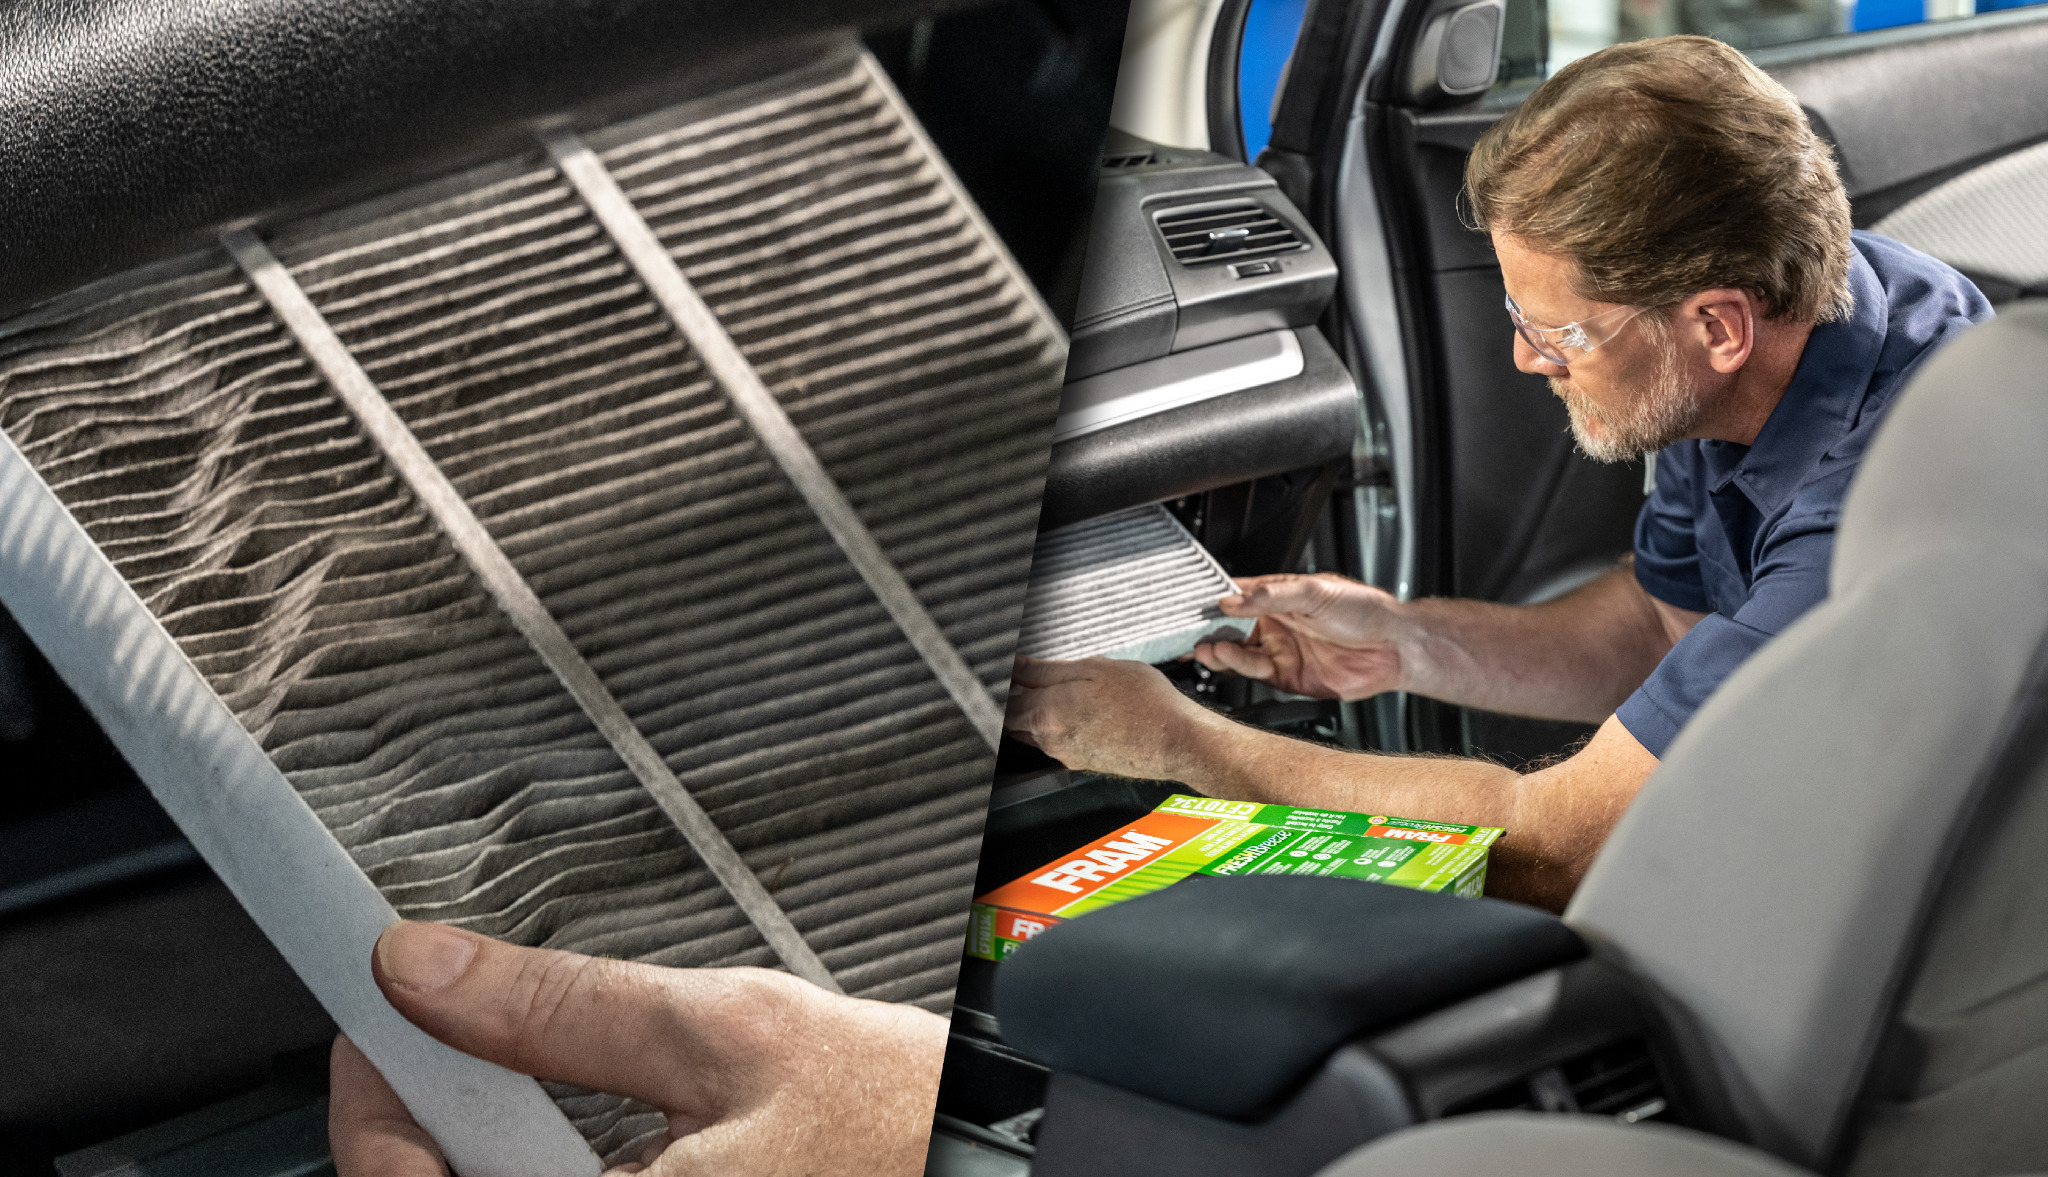
Credit: www.fram.com
Frequently Asked Questions
Can I Change My Cabin Air Filter Myself?
Yes, you can change your cabin air filter yourself. It’s a simple process for most car models. Check your car’s manual for guidance. You’ll need basic tools and a replacement filter. Regularly changing it improves air quality inside your car.
Save money by doing it yourself.
Is A Cabin Filter Easy To Replace?
Yes, a cabin filter is easy to replace. Most car models allow for quick access behind the glove box. Basic tools and minimal effort are required. Check your vehicle’s manual for specific instructions. Regular replacement improves air quality and HVAC efficiency.
How Often Should A Cabin Filter Be Changed?
Change the cabin filter every 12,000 to 15,000 miles or once a year. Check the owner’s manual for specific guidelines. Regular replacement ensures clean air and optimal HVAC performance.
Does Autozone Change The Cabin Air Filter?
No, AutoZone does not change cabin air filters. They sell the filters and provide guidance for DIY replacement.
What Is A Cabin Air Filter?
A cabin air filter cleans the air entering your vehicle’s interior, removing dust, pollen, and pollutants.
Conclusion
Changing your cabin air filter is a simple yet vital task. It ensures cleaner air inside your vehicle. Regular maintenance can enhance your car’s performance and extend its life. Follow these steps to keep your car’s interior fresh. Don’t overlook this easy DIY project for a healthier driving experience.